初学者

最近刚开始学Android开发,这是一个简单的聊天室文本输入的学习过程
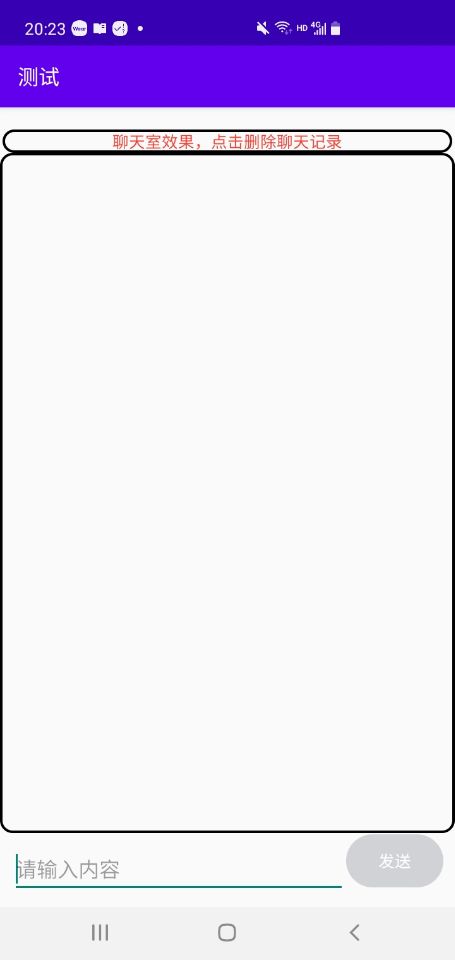
第一步当然是创建ui了!

视图分为三个部分,第一部分是一个水平分布的普通视图用来点击清除聊天记录,第二部是一个垂直布局的linearLayout,
下的一个textview用来显示输入框的输入内容,第三部分是一个水平分布的linearLayout,里面包含一个输入框和一个按钮。
bt_shape是一个边框,button_state是用来实现按钮没有输入信息时为灰色,有输入信息时为蓝色。

1
2
3
4
5
6
7
8
9
10
11
12
13
14
15
16
17
18
19
20
21
22
23
24
25
26
27
28
29
30
31
32
33
34
35
36
37
38
39
40
41
42
43
44
45
46
47
48
49
50
51
52
53
54
55
56
57
58
59
60
61
62
63
64
65
66
67
68
<?xml version="1.0" encoding="utf-8"?>
<LinearLayout xmlns:android="http://schemas.android.com/apk/res/android"
android:orientation="vertical" android:layout_width="match_parent"
android:layout_height="match_parent">

<TextView
android:id="@+id/tv_control"
android:layout_width="match_parent"
android:layout_height="wrap_content"
android:layout_marginLeft="2dp"
android:layout_marginRight="2dp"
android:layout_marginTop="20dp"
android:gravity="center"
android:textColor="@color/red"
android:background="@drawable/bt_shape"
android:text="聊天室效果,点击删除聊天记录" />

<LinearLayout
android:layout_width="match_parent"
android:layout_height="0dp"
android:layout_weight="1"
android:background="@drawable/bt_shape"
android:orientation="vertical">

<TextView
android:id="@+id/textView4"
android:layout_width="match_parent"
android:layout_height="0dp"
android:layout_weight="1"
android:gravity="left|bottom"
android:padding="10dp"
android:textColor="@color/black"
android:textSize="20sp"

/>

</LinearLayout>

<LinearLayout
android:layout_width="match_parent"
android:layout_height="wrap_content"
android:paddingRight="10dp"
android:paddingLeft="10dp"
android:paddingBottom="10dp"
android:orientation="horizontal">

<EditText
android:id="@+id/tv_input"
android:layout_width="wrap_content"
android:layout_height="wrap_content"
android:layout_marginTop="9dp"
android:layout_weight="1"
android:ems="10"
android:hint="请输入内容"
android:inputType="textPersonName"
android:text="" />

<Button
android:id="@+id/tv_send"
android:layout_width="wrap_content"
android:layout_height="wrap_content"
android:background="@drawable/button_state"
android:text="发送"
android:textColor="#FFFFFF" />
</LinearLayout>


</LinearLayout>

边框布局bt_shape

以下布局文件都放在res目录下的drawable里

1
2
3
4
5
6
7
8
9
10
11
12
13
<?xml version="1.0" encoding="utf-8"?>
<shape xmlns:android="http://schemas.android.com/apk/res/android">

<corners

android:radius="10dp"
/>
<stroke android:width="2dp"
android:color="@color/black">

</stroke>
</shape>

button_state由两个布局文件实现

一个是按钮为灰色一个是为蓝色

灰色布局btn_no_enable_color

1
2
3
4
5
6
7
8
9
10
11
12
13
14
15
16
17
<?xml version="1.0" encoding="utf-8"?>
<shape xmlns:android="http://schemas.android.com/apk/res/android">
<solid android:color="#D0D2D5"/>
<!-- 设置按钮的四个角为弧形 -->
<!-- android:radius 弧形的半径 -->
<corners android:radius="105dip"/>

<!-- padding: Button 里面的文字与Button边界的间隔 -->
<padding
android:left="10dp"
android:top="10dp"
android:right="10dp"
android:bottom="10dp"
/>

<!--设置不可点击时,按钮的颜色为灰色 -->
</shape>

绿色布局btn_enable_color

1
2
3
4
5
6
7
8
9
10
11
12
13
14
15
16
17
18
<?xml version="1.0" encoding="utf-8"?>
<shape xmlns:android="http://schemas.android.com/apk/res/android">

<!-- 设置按钮的四个角为弧形 -->
<!-- android:radius 弧形的半径 -->
<corners android:radius="105dip"/>

<!-- padding: Button 里面的文字与Button边界的间隔 -->
<padding
android:left="10dp"
android:top="10dp"
android:right="10dp"
android:bottom="10dp"
/>
<solid android:color="#2196f3"/>

<!-- 设置可点击时,按钮的颜色为蓝色 -->
</shape>

but_second_shape实现触摸点击

1
2
3
4
5
6
7
8
9
10
11
12
13
14
<?xml version="1.0" encoding="utf-8"?>
<selector xmlns:android="http://schemas.android.com/apk/res/android">


<item android:state_enabled="true"
android:drawable="@drawable/btn_enable_color"/>

<item android:state_enabled="false"
android:drawable="@drawable/btn_no_enable_color"/>

<!-- android:state_enabled 能够接受触摸或者点击事件,
当state_enabled=true时,按钮状态是可以被点击,当state_enabled=false,按钮状态是不能被点击-->

</selector>

ui布局完成之后就是用于实现具体的效果的代码

onClick(View v)是一个单机事件,如果你想用长按可以使用onLongClick(View v)来实现,当然你还要用setOnLongClickListener(this)来
实现长按监听的。

1
2
3
4
5
6
7
8
9
10
11
12
13
14
15
16
17
18
19
20
21
22
23
24
25
26
27
28
29
30
31
32
33
34
35
36
37
38
39
40
41
42
43
44
45
46
47
48
49
50
51
52
53
54
55
56
57
58
59
60
61
62
63
64
65
66
67
68
69
70
71
72
73
74
75
76
77
78
79
80
81
82
83
84
85
86
87
88
89
90
91
92
93
94
95
96
97
98
99
100
101
102
103
104
105

package com.example.test;

import android.os.Bundle;
import android.text.Editable;
import android.text.TextUtils;
import android.text.TextWatcher;
import android.text.method.ScrollingMovementMethod;
import android.view.View;
import android.widget.Button;
import android.widget.EditText;
import android.widget.TextView;
import android.widget.Toast;

import androidx.appcompat.app.AppCompatActivity;

import org.apache.commons.lang3.StringUtils;
import org.w3c.dom.Text;

import java.sql.Time;

public class communic extends AppCompatActivity implements View.OnClickListener, TextWatcher {


private TextView tv_control;
private TextView mTextview4;
private EditText minput;
private Button send;

protected void onCreate(Bundle savedInstanceState) {
super.onCreate(savedInstanceState);
setContentView(R.layout.communication);
initView();
}

private void initView(){
tv_control = (TextView) findViewById(R.id.tv_control);//普通视图

tv_control.setOnClickListener(this);

mTextview4 = (TextView) findViewById(R.id.textView4);//聊天框

//设置滑动属性
mTextview4.setMovementMethod(ScrollingMovementMethod.getInstance());

minput = (EditText) findViewById(R.id.tv_input);//输入框

minput.setOnClickListener(this);

send = (Button) findViewById(R.id.tv_send);//发送按钮
//单机监听
send.setOnClickListener(this);
//按钮状态
send.setEnabled(false);
//设置监听器,监听字数
minput.addTextChangedListener(this);
}
@Override
public void onClick(View v) {
switch (v.getId()){
case R.id.tv_send:
submit();
minput.setText("");
break;

case R.id.tv_control:
mTextview4.setText("");
break;
}

}
private void submit(){
//trim()去除字符串的头尾空格;
String input = minput.getText().toString().trim();
//判断按键状态
if (TextUtils.isEmpty(input)){
Toast.makeText(this,"输入不可为空",Toast.LENGTH_SHORT).show();
return;
}else{
String result = String.format("\n%s %s", new Time(System.currentTimeMillis()),input);
mTextview4.append(result);
}
}

//在EditText改变之前被调用
@Override
public void beforeTextChanged(CharSequence s, int start, int count, int after) {
send.setEnabled(false);
}
//在Text改变过程中触发调用
@Override
public void onTextChanged(CharSequence s, int start, int before, int count) {

}
//在EditText内容已经改变之后调用
@Override
public void afterTextChanged(Editable s) {
if (StringUtils.isEmpty(minput.getText())){
send.setEnabled(false);
}else {
send.setEnabled(true);
}
}
}

这是一个实现的过程

实现gif